- Summary
- Configuration
- Validate Image Uploader
- Image Uploaders
- Upload Automatically When Insert Images
- Usage
- Troubleshooting
- “Please set an image uploader in Preferences Panel before using this function.”
- “command not find”
- Image Upload Failed
- Garbled console output on Windows
- [PicGo ERROR]: Error: API v1 is deprecated, please refer to https://doc.sm.ms/ for v2 API documentation.
- Fail to parse result image path from
- EPERM: operation not permitted mkdir “**/upload”
- Migration from older Typora version
Summary
In newer version of Typora, we added a “upload image” function to upload images to a cloud image storage via 3rd apps or scripts.
Its motivation is that, since markdown files is just plain text files, when you embed images, the markdown files does not “own” those images, but just keep a weak reference to used external image files. When you move or share markdown files, those images should also be moved or shared, which brings maintenance costs. But if those images are hosted online, you can move or share markdown files freely without maintaining the reference between text plain and the images it used.
Typora now supports apps like iPic, uPic, PicGo, etc, which is able to upload your images into Imgur, Flickr, Amazon S3, Github, or other image hosting services.
Warning!
Before you use this feature, please notice that Typora does not own those image uploader apps or cloud storage services, they are all 3rd services, so please take care about their license, user agreement, privacy policy, service stability and reliability by yourself.
By using this feature after enabled in preferences panel, Typora will pass the path of used images to those 3rd tools, then they will upload your images to a 3rd (or 4th) cloud image storage, Typora has no control or guarantee over this process, so please pick up a reliable service to ensure your data security.
Besides the privacy and reliability issues, some service may have an expiration time for hosting your images, some service may not provide a “delete” function even after you uploaded sensitive images by accident, and service follows laws that is not in your country, banning certain type of images or users in certain country, etc.
In short, please read their manual then choose the app and service for uploading images.
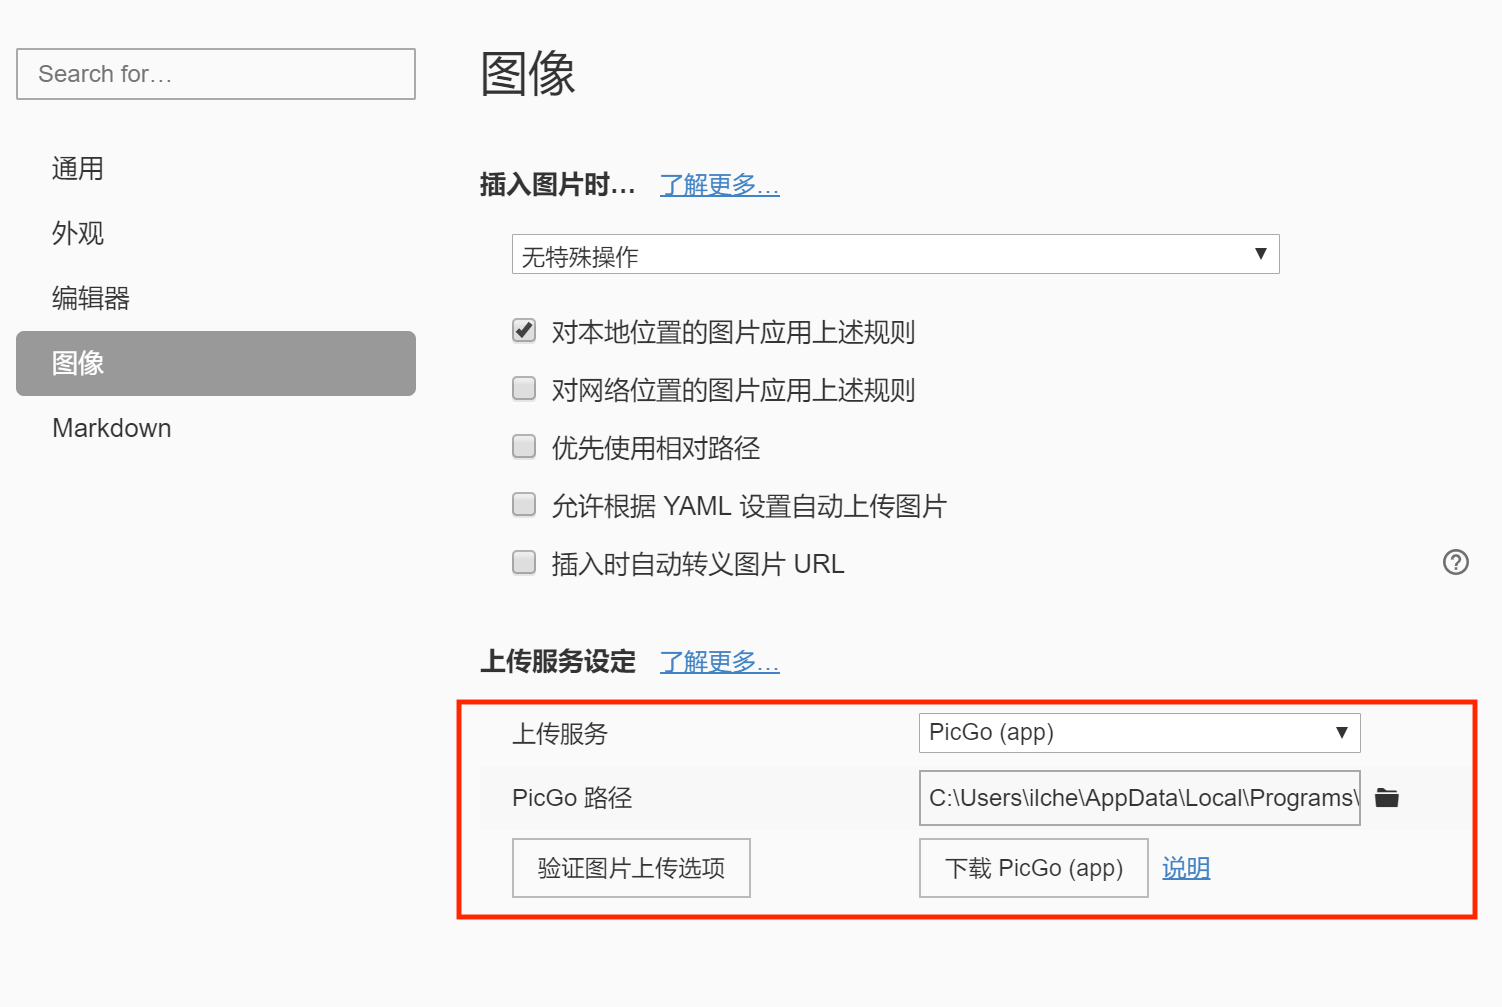
Configuration
You can enable and config image uploader in preferences panel.

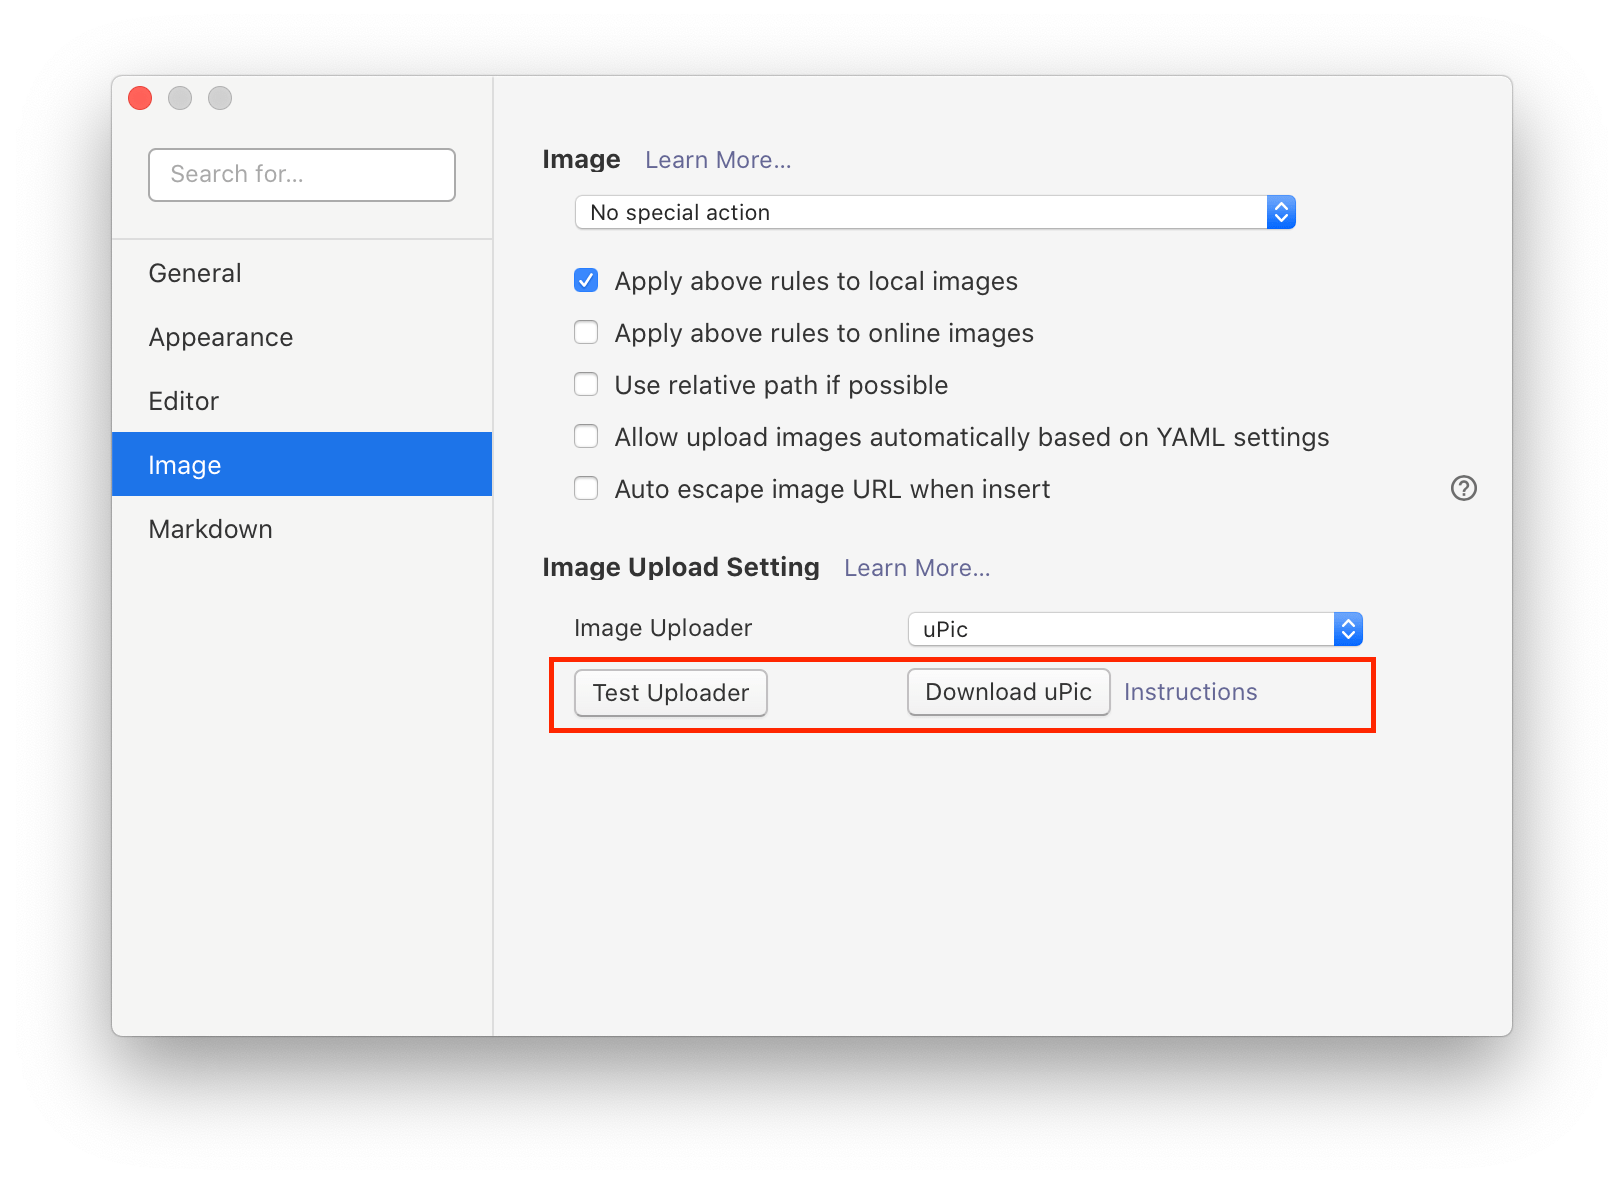
After select one option, you may need to download and installed the required app, do simple configuration of which cloud storage you want to host your images on that app, then click “Test Uploader” to test if Typora can upload local images using current service and configuration.
Validate Image Uploader
By clicking the “Test Uploader” button, Typora will try to upload test images using current configuration, you can see the details, error messages, and final url result after upload on following “Validation” dialog:
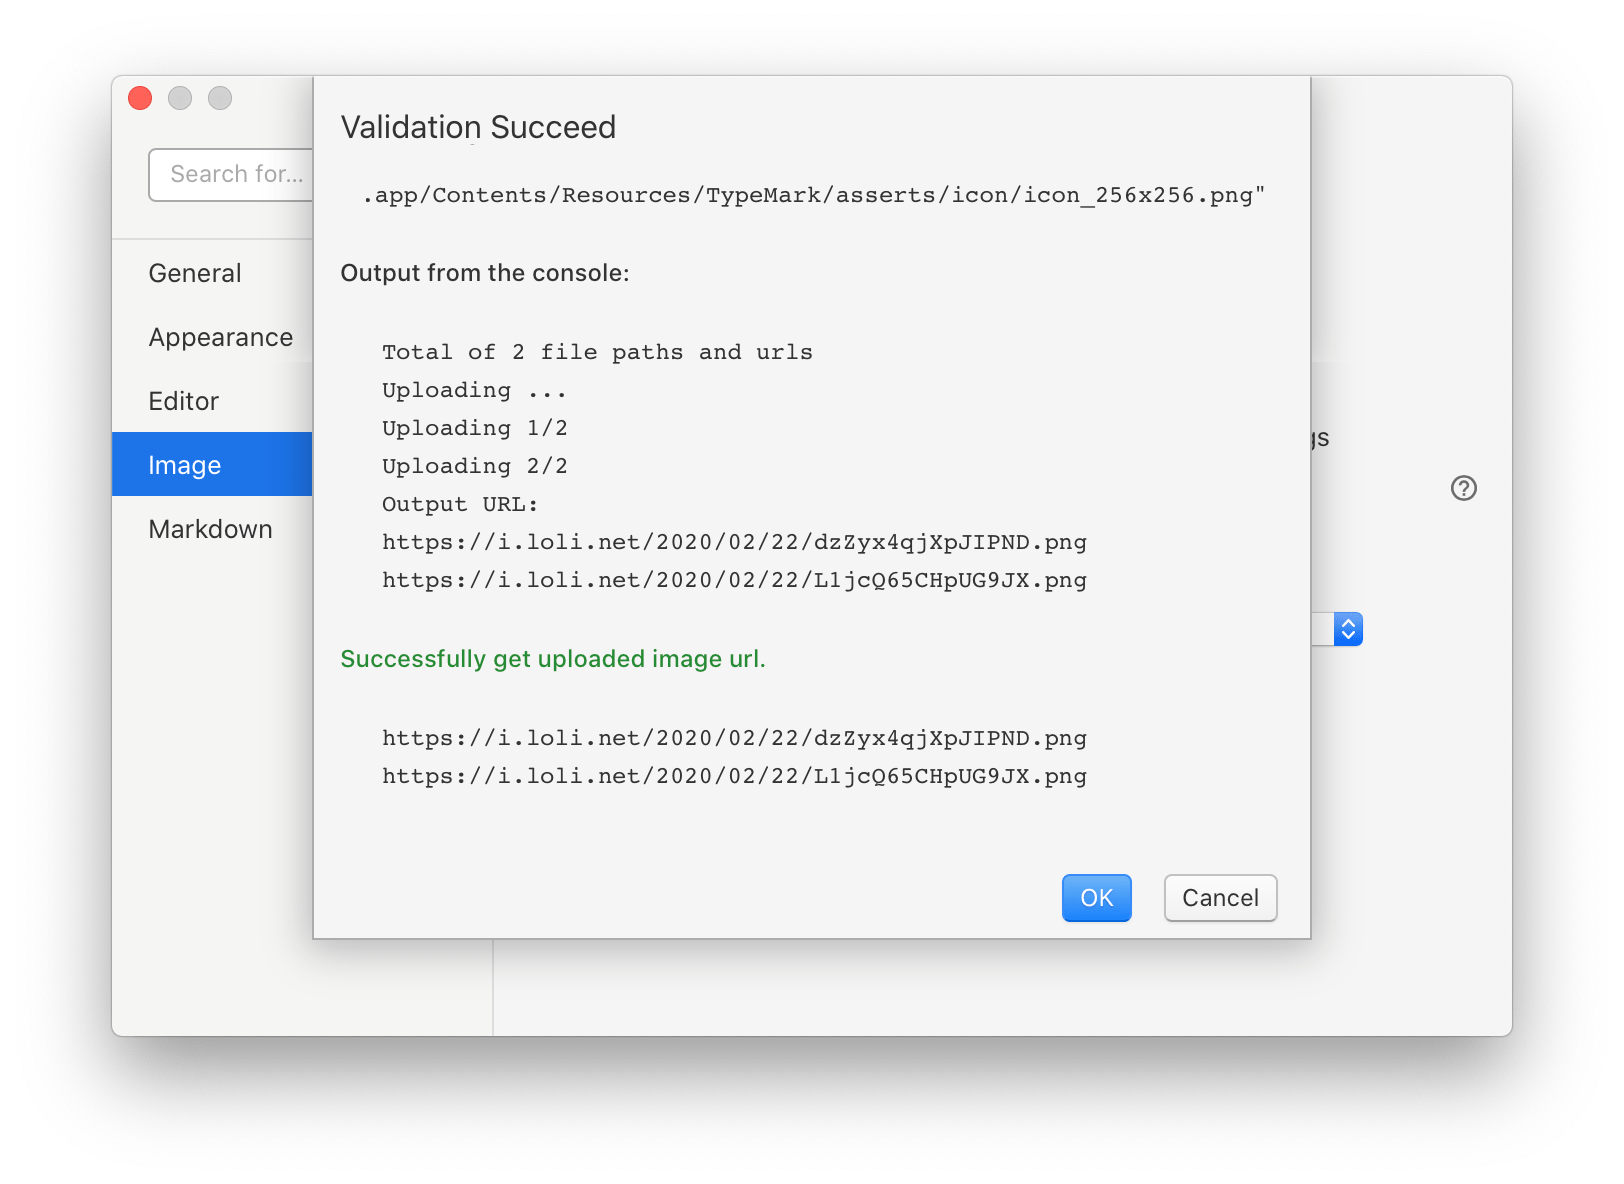
If it shows “Validation Failed”, you need to check the reason from the raw output.
Image Uploaders
iPic (macOS, Freemium)

iPic is a freemium app which allows you to upload local images into various cloud service, including Imgur, Flickr, Amazon S3, etc, and return you a web url of the uploaded image for public access.
To use iPic as the image uploader service, you just need to install iPic app from MAS or from their website, then config its image host following instructions here. And select “iPic” as “image uploader” in preferences panel of Typora, then you can upload images to preferred cloud image storage using iPic.
uPic (macOS, OpenSource)
![]()
uPic is a native, powerful, beautiful and simple picture and file upload tool for macOS.
You could install via Homebrew:
brew cask install upic
Or Download from github release.
To use uPic as the image uploader service, you just need to install iPic app from the instructions above, then config its image host following instructions here. And select “uPic” as “image uploader” in preferences panel of Typora, then you can upload images to preferred cloud image storage using uPic.
uPic also has a detailed English Document.
Picsee (macOS, Freemium)

Picsee is an image viewer & organizer on macOS.
You could install it from Mac App Store. To configure Picsee to upload your images, please refer:
PicGo-Core (Command line) (OpenSource)
PicGo-Core is an open source node module that supports picture uploading. It also supports plugins to extend its functionality.
Since it is a node module, we provide two ways to install and use it.
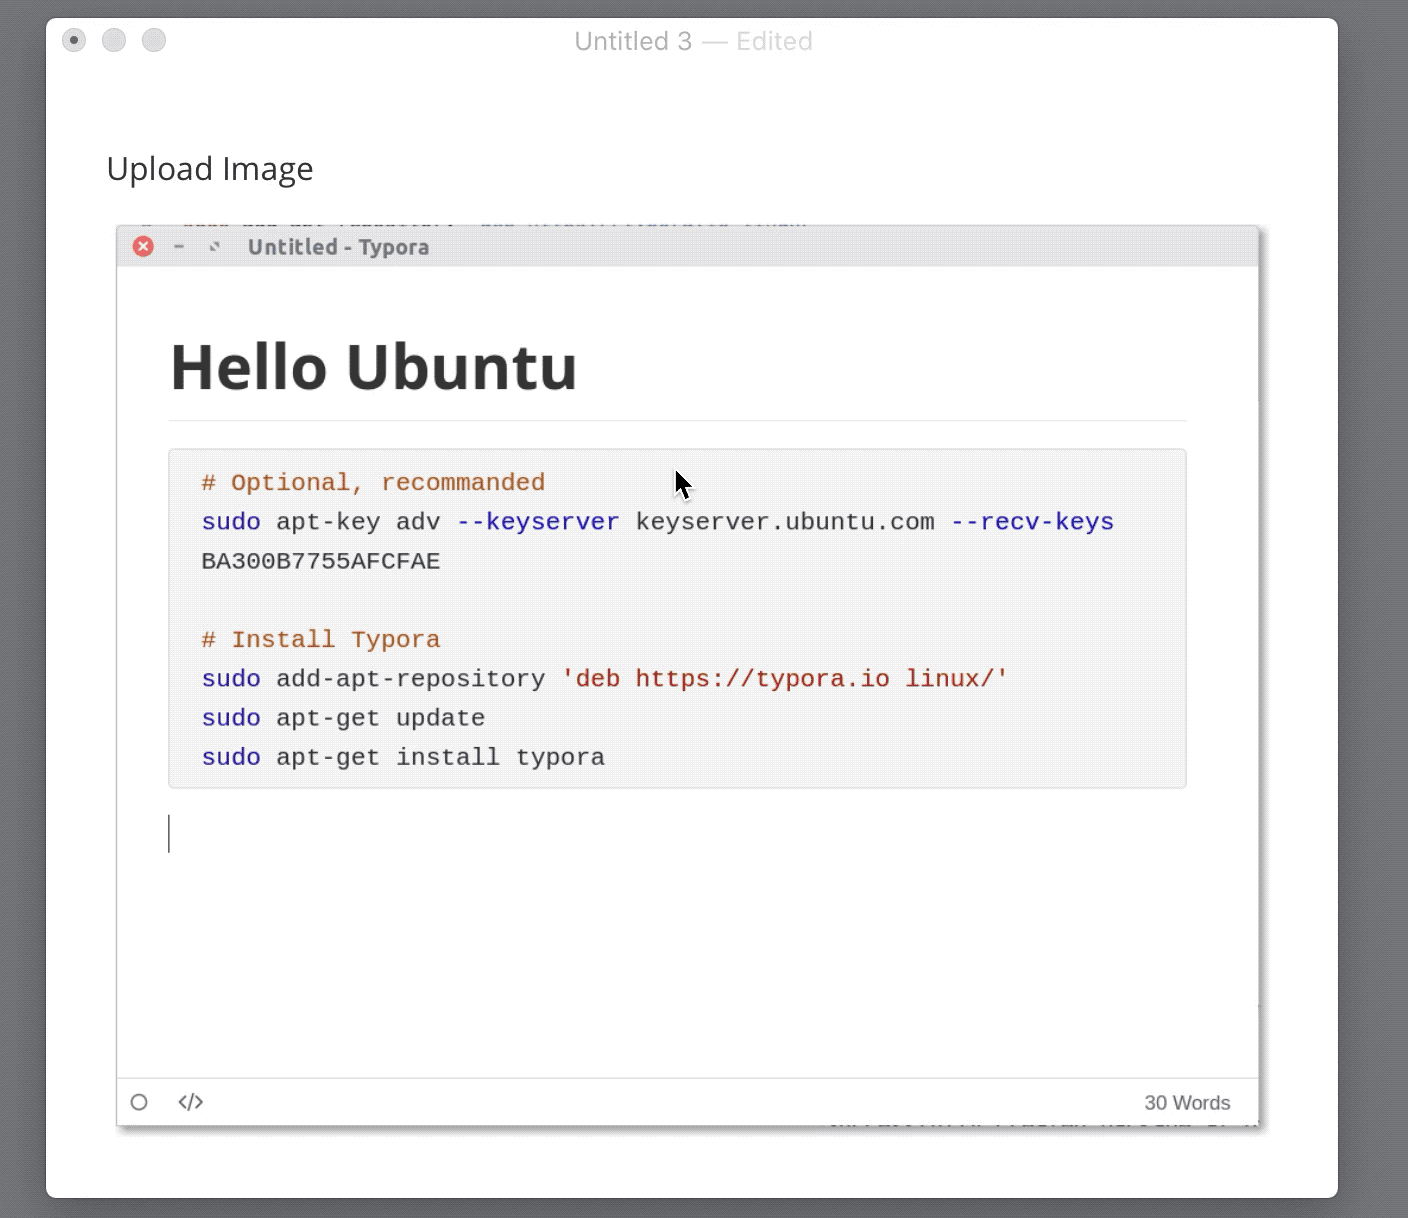
Install prebuilt binary of PicGo-Core (Linux / Windows)
Typora provide a prebuilt binary of PicGo using nexe to packing the node module into one-file binary. You could just click the “Download” button to install the PicGo binary, and Typora will start downloading and put it under Typora’s support folder directly.
Location of downloaded PicGo-Core binary
The binary will be put under "%AppData/Typora/picgo", ""%AppData" is ""~/.config" on Linux and "C:/User/[username]/Roaming/AppData" on Windows. You could also try click "open theme folder" in Typora's preferences panel, then open its parent folder, which will contains the "picgo" folder.Due to the security rule of macOS Catalina, the prebuilt binary is not functionally on Catalina, so you may try the following option:
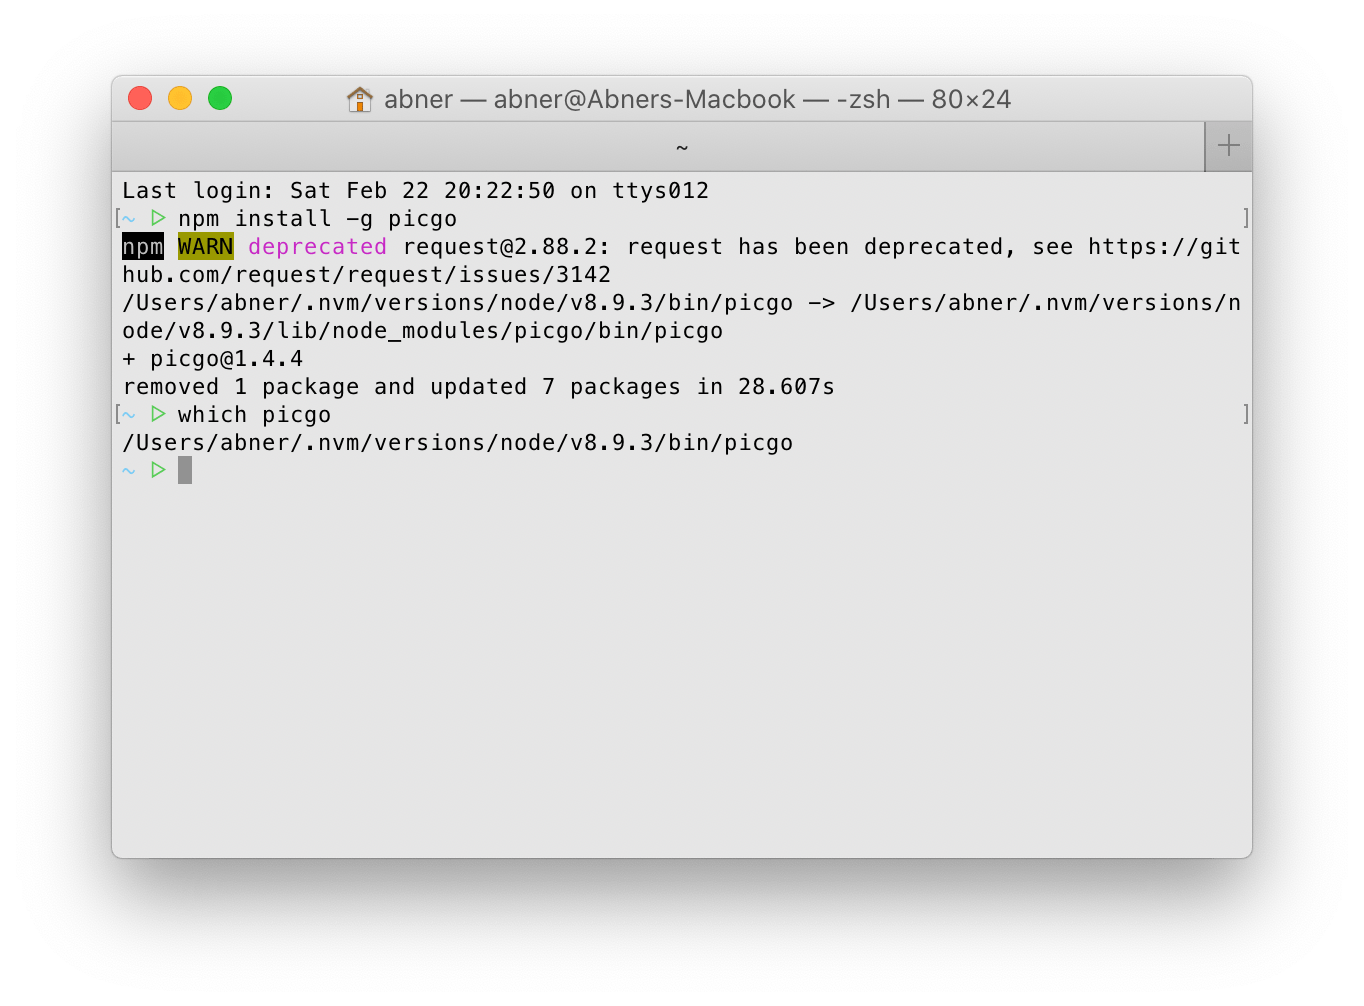
Install PicGo-Core via node package manager (Requires NodeJS runtime)
If you have node or yarn installed, you cloud run following commands in terminal.
npm install picgo -g

# or

yarn global add picgo
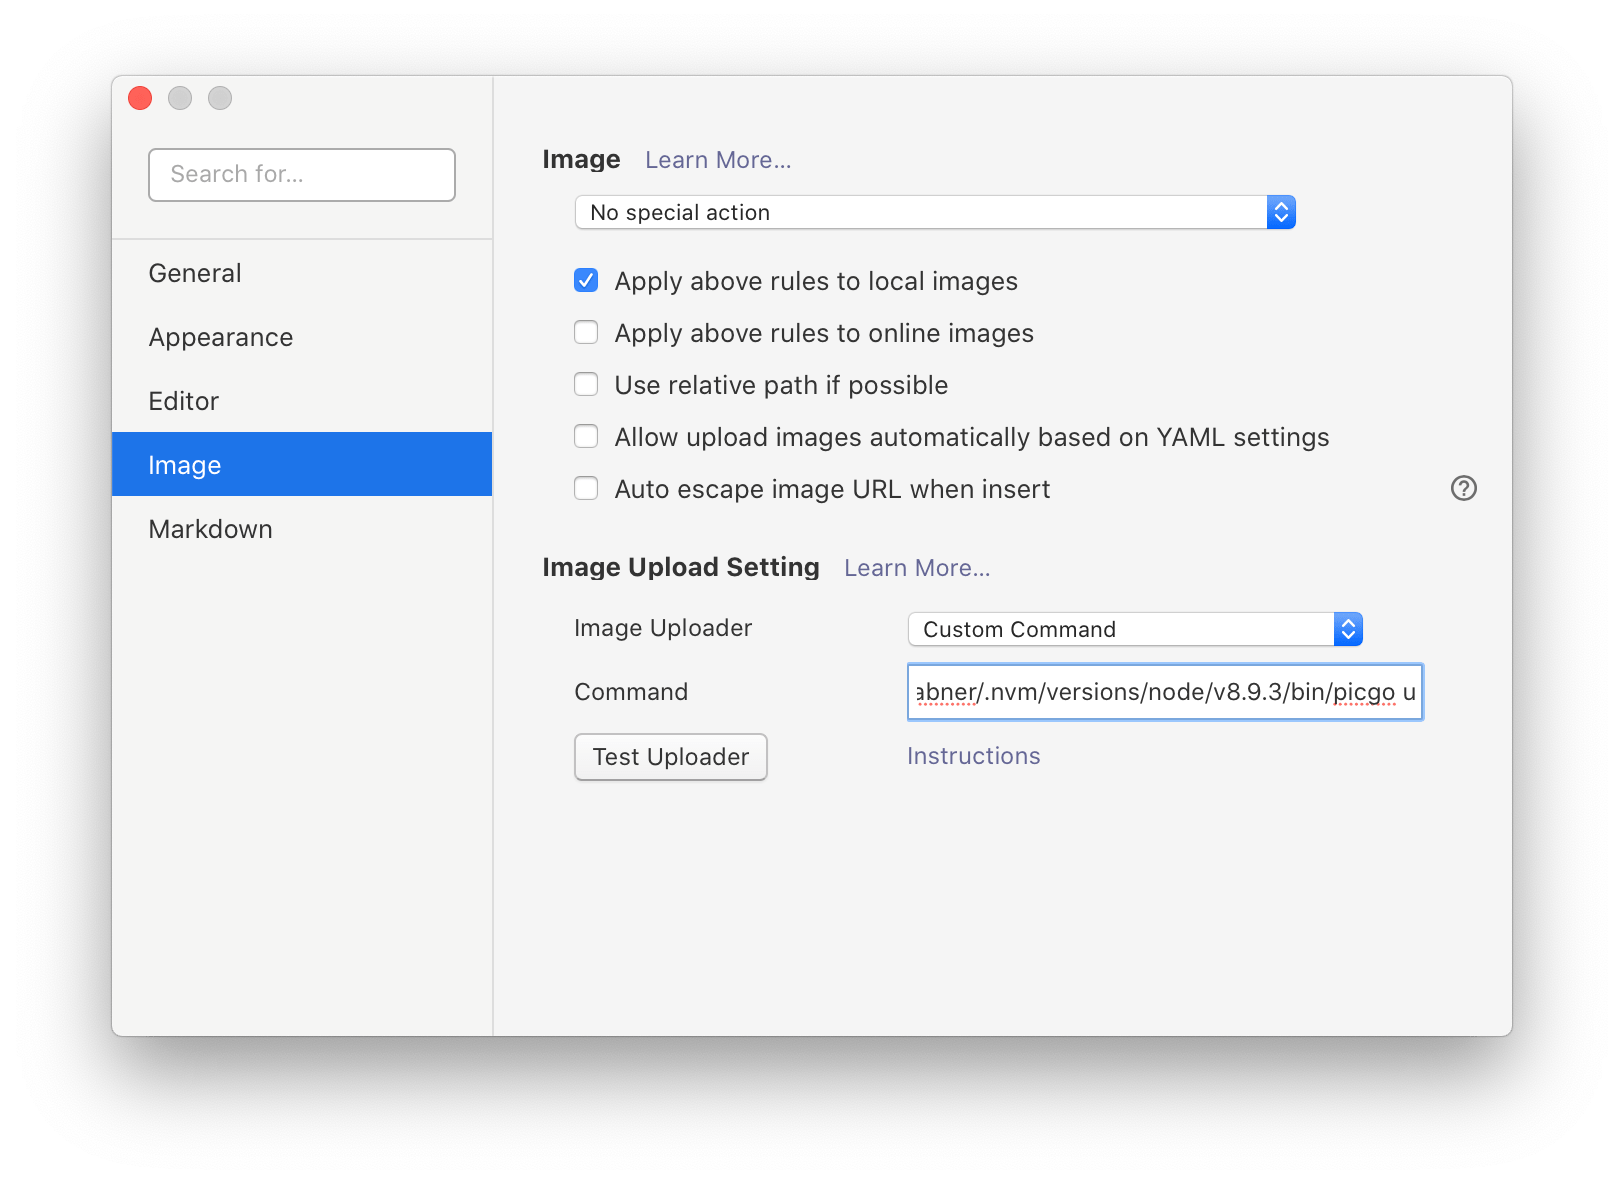
Then you can input “which picgo” in terminal to get its actual installed location, then, select “Custom Command” as the “Image Uploader” function and input “[your node path] [your picgo-core path] upload” as the command. If you have “node” and “picgo” installed in system PATH directly, you could also fill “picgo upload” as the custom command directly.
Config PicGo-Core
Option 1: Edit the config file
Please edit config.json at following location
- Linux / macOS →
~/.picgo/config.json. - Windows →
C:\Users\[your user name]\.picgo\config.json.
For details, please refer to this document (Chinese Only).
Option 2: Config via CLI
If you installed pico-core via node, please input picgo -h to show help of picgo, and do configuration follow its help.
If you used the prebuilt binary of PicGo-Core installed from Typora’s preferences panel, please find the binary from the folder (see instructions here), then open the folder in terminal, and do configurations via (./picgo -h).
You can find its CLI usage in https://github.com/PicGo/PicGo-Core#use-in-cli.
Use Plugins
You can use the cli interface to install plugins of PicGo-Core.
PicGo.app (Chinese Language Only)

PicGo is an GUI app built from PicGo-Core. Since it only provides a Chinese user interface, you will find this option only when your Typora is using Simplified Chinese language.
To use with Typora, we require PicGo ≥ 2.2.0 with PicGo-Server enabled and use port in default value (36677). And when Typora upload images using PicGo, PicGo will be launched and kept running.
For Linux / Windows users, please set the path of PicGo binary in Typora’s preferences setting after install it.
Difference between PicGo.app and PicGo-Core (command line)
- Currently PicGo (app) is Chinese only.
- PicGo.app provides a GUI, and therefore more easy to setup compared with the CLI version.
- Upload using PicGo-Core (command line) costs less computing resources, because the process will only be running during the uploading process, and will exit after uploading succeed or failed. While uploading via PicGo.app, PicGo.app will be always kept running can not exit automatically. Also, PicGo.app is an electron app, which eats more computing resources.
- PicGo.app and PicGo-Core use different config files, but you can copy the json object under
picBedkey in the config file of PicGo.app into PicGo’s config file. - PicGo.app provides other features, like upload history, auto rename, etc.
PicList (Chinese Language Only)

PicList is an image uploading tools developed on top of PicGo, it offers functionality to delete your remote images, and many other features as well. And when Typora upload images using PicGo, PicGo will be launched and kept running.
For Linux / Windows users, please set the path of PicGo binary in Typora’s preferences setting after install it.
Upgit (Open source & lightweight native, for Windows / Linux / macOS)
![]()
Upgit is a native & lightweight tool to help you upload images to a github repository.
Usage:
(1) Download it from Release.
(2) Rename it to upgit (For Windows users, upgit.exe), save it to somewhere you like.
(3) Configure it with ~/.upgit.config.toml or [UPGIT_DIRECTORY]/config.toml in following this sample config file.
(4) Select File > Preferences…
Move to Image. Choose Custom Command as your Image Uploader.
Input upgit program location into Command textbox.
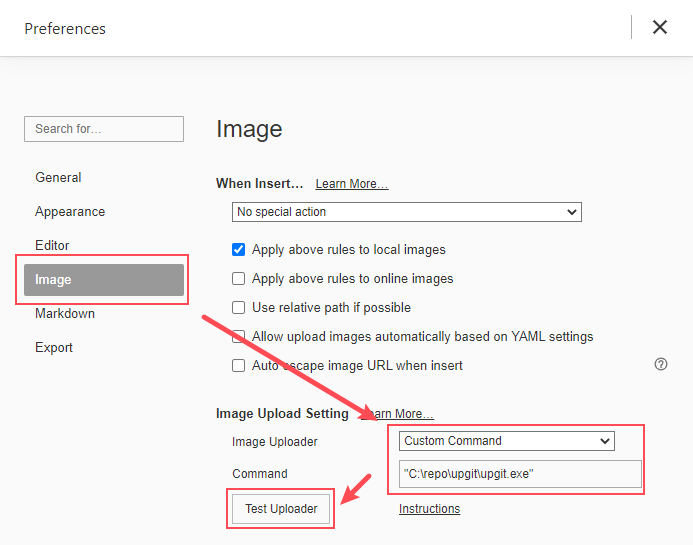
Now enjoy it!
Other Tools
There are some other tools you can use, please refer to custom section to set them as the image uploader.
pic_to_github
Custom
You could config a custom command to upload images, using tools that is not listed in above options, or even write your own tools / scripts. Typora will append all images that needs to be uploaded after the custom command you filled.
Then, Typora will fetch image urls from the last N lines of the standard output of your custom command. (N is the number of images to upload).
For example, if you write a tool upload-image.sh, then you can input [some path]/upload-image.sh in the command filed. Typora will call [some path]/upload-image.sh "image-path-1" "image-path-2" to upload two images located in image-path-1 and image-path-2. Then the command may return something like:
Upload Success:
http://remote-image-1.png
http://remote-image-2.png
Then Typora will get the two remote image url from the output, and replace the original local images used in the Markdown document.
You could click the “Test Uploader” button to verify your custom commands.
Use current filename / filepath in custom commands
You can use ${filename} and ${filepath} in your custom commands, they will be replace as the current markdown file name and current file path. For “untitled” files that have not been saved on your disk, they will be empty strings.
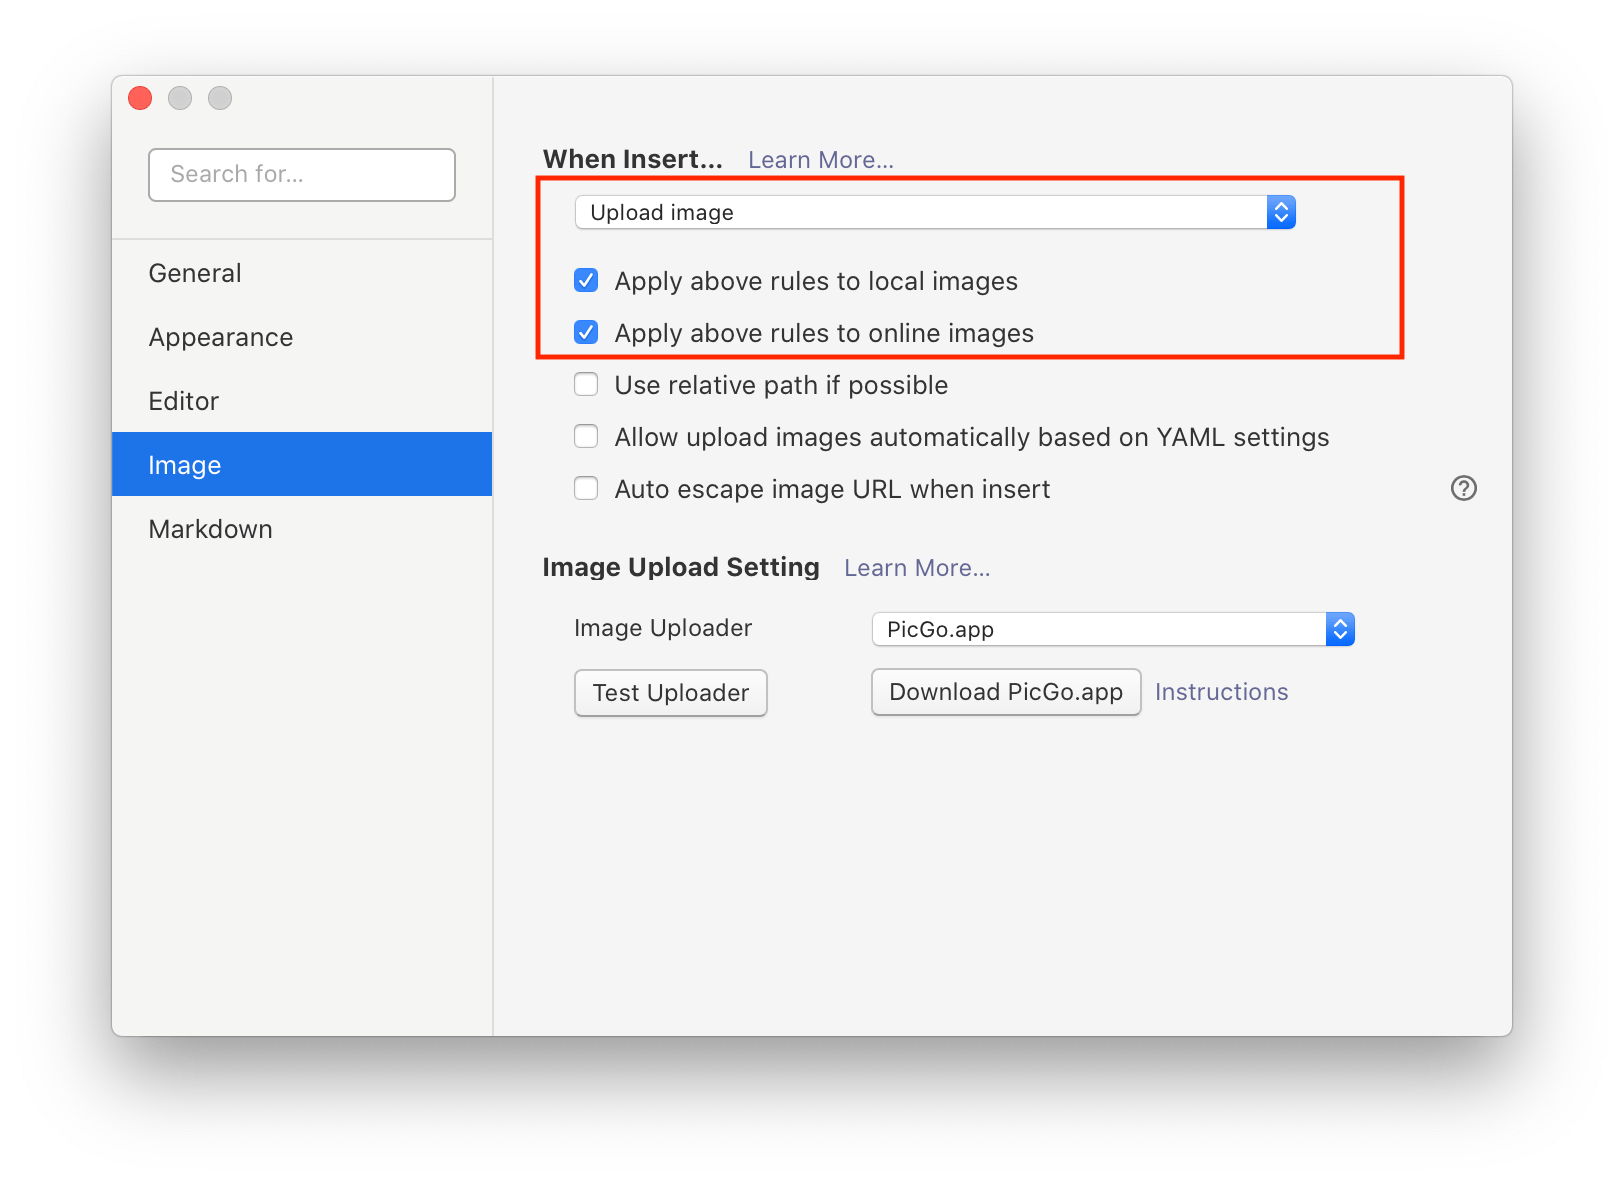
Upload Automatically When Insert Images
Global Setting
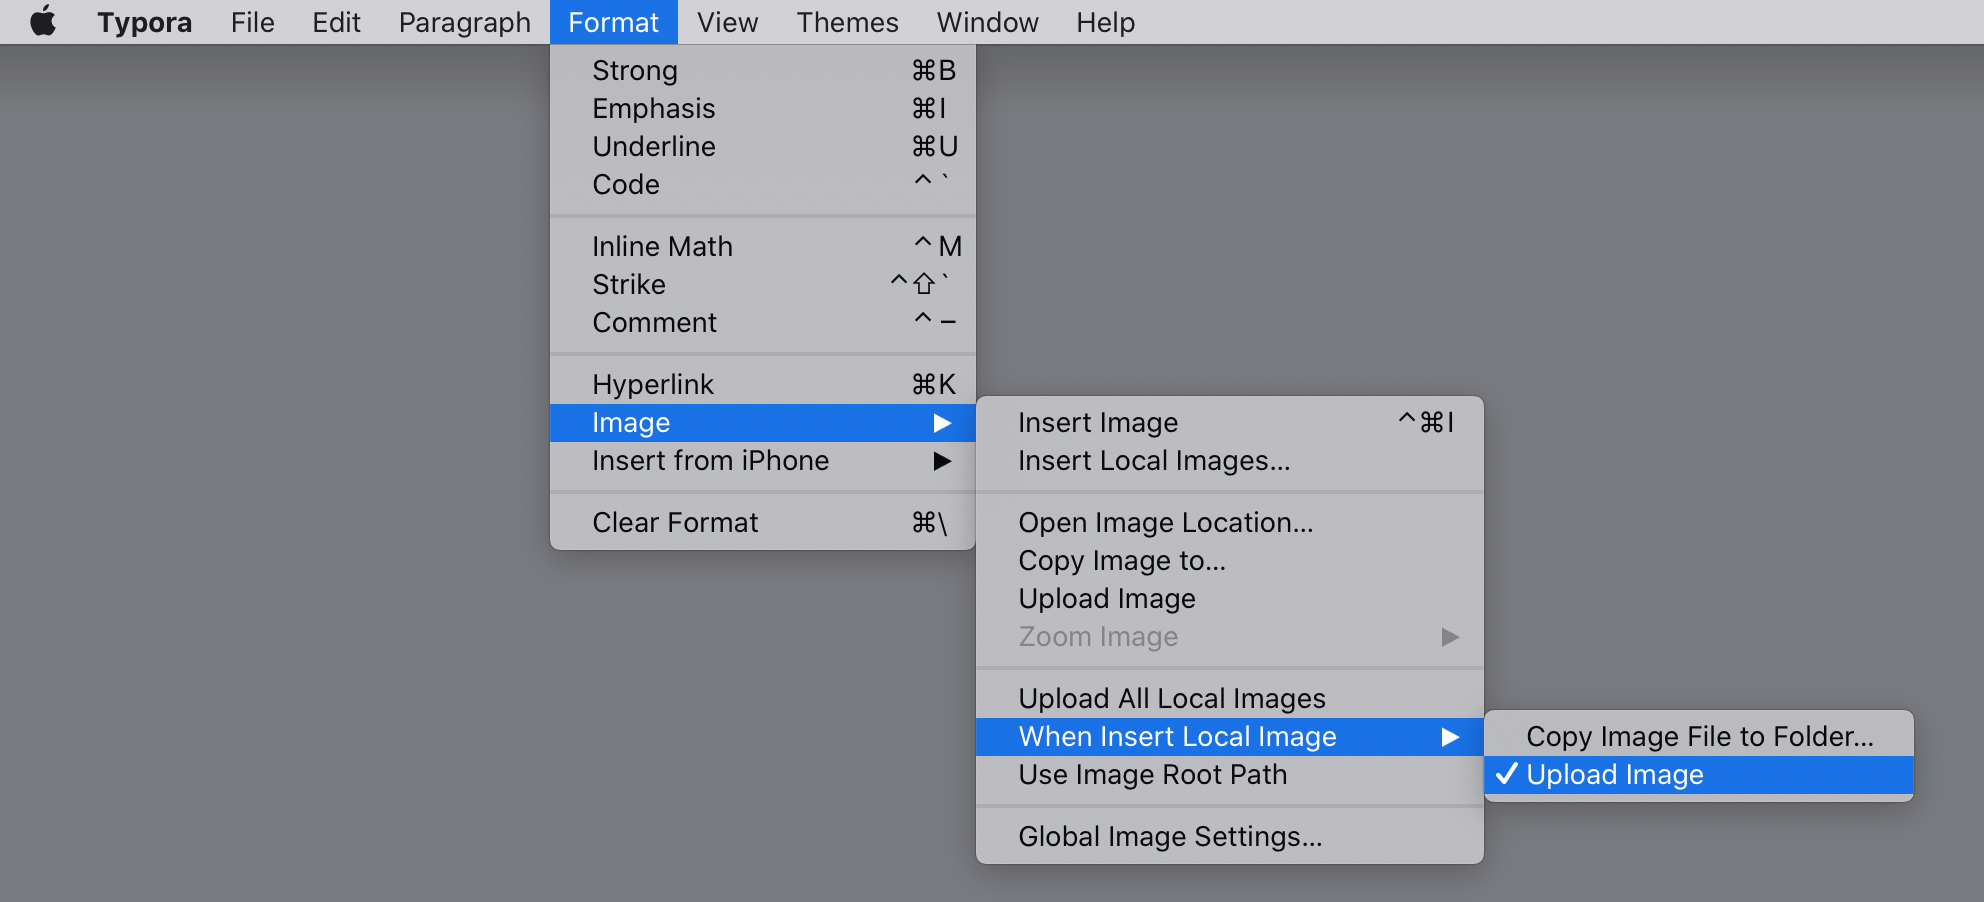
User can tell Typora to upload images automatically when insert (including insert image from menu, Touch Bar, via copy & paste or drag & drop). To enable this feature, please select “Upload Image” under “When Insert…” options like following screenshot suggests.
Then, if you want the “auto upload” only applies to local images, please only check Apply above rules to local images, if you also want to re-upload images that is already hosting on remote website, you can also check Apply above rules to online images.
Per-document Setting
Firstly, please enable Allow upload images automatically based on YAML settings in preferences panel.
Then if your Markdown file contains following config in YAML front matter, Typora will use this option to upload images automatically when insert image:
typora-copy-images-to: upload
You could also click menu → Format → Image → When insert local image… → Upload Image to insert this YAML front matter and enable this behavior.
Usage
Upload Selected Image
You could right click on an image, and click “Upload Image” to upload selected image using the app configured in preferences panel.
Upload All Local Images
If your Markdown files contains lots of local images, and you want to upload all of them in one click, you could click menu → Format → Image → Upload All Local Images to upload all local images.
Troubleshooting
“Please set an image uploader in Preferences Panel before using this function.”
In order to make “image upload” functional, you must set an image uploader in Preferences Panel following the configuration section.
“command not find”
If you sent custom command for example “node upload-image xxx” to upload file, you may met error with message “/bin/bash xxx command not find”, that is because your custom command binary is not in your system path.
For example, if the error message is “node command not find”, then please use which node in terminal to decide your node path, then replace node with fulle node path.
Image Upload Failed
When upload image failed, Typora will print the error message when calling the 3rd app you configured as image upload provider. You could find the cause from the error message.
If you cannot know the cause, you could try validate the image upload option by clicking the “Test Uploader” button in preferences panel, and if it success or not. Also, you may try if you upload images using those app without Typora, and check if it can succeed or not.
If you find those app cannot upload images successfully, you could contact to their maintainer for further support.
Garbled console output on Windows
If you use, custom command, and after clicking “Test Uploader” button in preferences panel, and its console output is Garbled characters, you may try to force the process to use UTF8 encoding, by prepending @chcp 65001 >nul & cmd /d/s/c before your custom command.
[PicGo ERROR]: Error: API v1 is deprecated, please refer to https://doc.sm.ms/ for v2 API documentation.
It is caused by PicGo’s support issue of its default image hosting service: sm.ms, please refer PicGo/PicGo-Core#30, or use other image service other than the default one
Fail to parse result image path from
Like #3309, Typora requires the return url of an image to start with http://, https://, or file://. Other protocols are not supported. Also, in HTML / Markdown, image src without protocols, are treated like relative path.
EPERM: operation not permitted mkdir “**/upload”
This should be fixed in 0.9.87, please upgrade Typora.
Migration from older Typora version
In older version of Typora on macOS, we only provide the integration with “ipic”. So if your older Markdown document contains
typora-copy-images-to: ipic
Typora will still use ipic to upload images in this file, you could update the behavior by changing into typora-copy-images-to: upload.